🎯 Reproducible local Internal Development Platform (IDP) for developing and testing Data Science and Machine Learning projects 🚀
1. MacOS Settings
✅ Show your Mac's hidden files
Find Terminal under Launchpad > Other > Terminal, then run the following commands:
Type
defaults write com.apple.Finder AppleShowAllFiles trueand press EnterType
killall Finderand press Enter again
✅ Create APFS Volumes & Setup Workplace Folder
  ## Change to your user directory
  cd ~
  ## Check if the workplace folder exists
  ls -l workplace
  ## If you see "workplace -> /Volumes/Workplace" continute to Part 4
  ## If you see "ls: workplace: No such file or directory" create the symlink
  ln -s /Volumes/Workplace ~/workplace
  ## Otherwise, if you see some other output, you already have a workplace folder but it is not linked to the encrypted volume.
  ## You may want to consider moving that content to a new folder (eg workplace_old) and then create the symlink with the above command.
  ## This will make following future commands and guides easier since they all assume you have the workplace folder.
  ## Ask for help if you need it since getting this wrong will make the rest of the guide much harder.
  ## Check if the workplace folder symlink is correct
  ls -l workplace
  ## ✅ You should see "workplace -> /Volumes/Workplace"
⚠️ WARNING: The
Disk Utilityprogram should now have the volumes, make sure under the name it says:System: APFS Volume •Workplace: APFS (Encrypted)✅ Installing Homebrew Package Managers
## Install Homebrew from the Git repository /bin/bash -c "$(curl -fsSL https://raw.githubusercontent.com/Homebrew/install/HEAD/install.sh)" ## Follow along with the prompts to complete the installation. ## You may want to restart the Terminal after installation to make sure the PATH variable is set correctly ## If you see a warning during installation such as ## - Run these two commands in your terminal to add Homebrew to your PATH: (echo; echo 'eval "$(/opt/homebrew/bin/brew shellenv)"') >> ~/.zshrc eval "$(/opt/homebrew/bin/brew shellenv)" ## Install Ruby to use Amazon Homebrew formulas without sudo # brew install ruby ## REQUIRED: Turn off Homebrew analytics brew analytics off brew update brew upgrade # brew list # /usr/bin/python3- ✅ Invoke Apple’s Software Update Tool
softwareupdate --install -a
✅ Updating Git
  ## Install an updated version of Git
  # brew install git
  # sudo xcode-select -switch /Library/Developer/CommandLineTools

  ## Check if your username and email are configured correctly in Git
  git config --list
  ## If either your username or email is not set properly, then update it with the respective command
  git config --global user.name "Thanh Nguyen"
  git config --global user.email nnthanh101@gmail.com
✍️ NOTE: This guide assumes you are using ZSH as your shell.
✅ If running
echo $SHELLin your Terminal returns/bin/zsh, then you shouldn’t run into any issues.[ ] If you are using Bash (
/bin/bashis returned instead), then change~/.zshrcto~/.bash_profilewhenever you are exporting variables.
2. Docker Desktop & VSCode
2.1. Install Docker Desktop
✅ MacBook-Pro Resource Settings:
MacBook - 8 vCPU, 16GB Memory, 250GB SSD Disk
Docker - 6 vCPU, 8GB Memory, Swap 1GB, 56GB Virtual-Disk
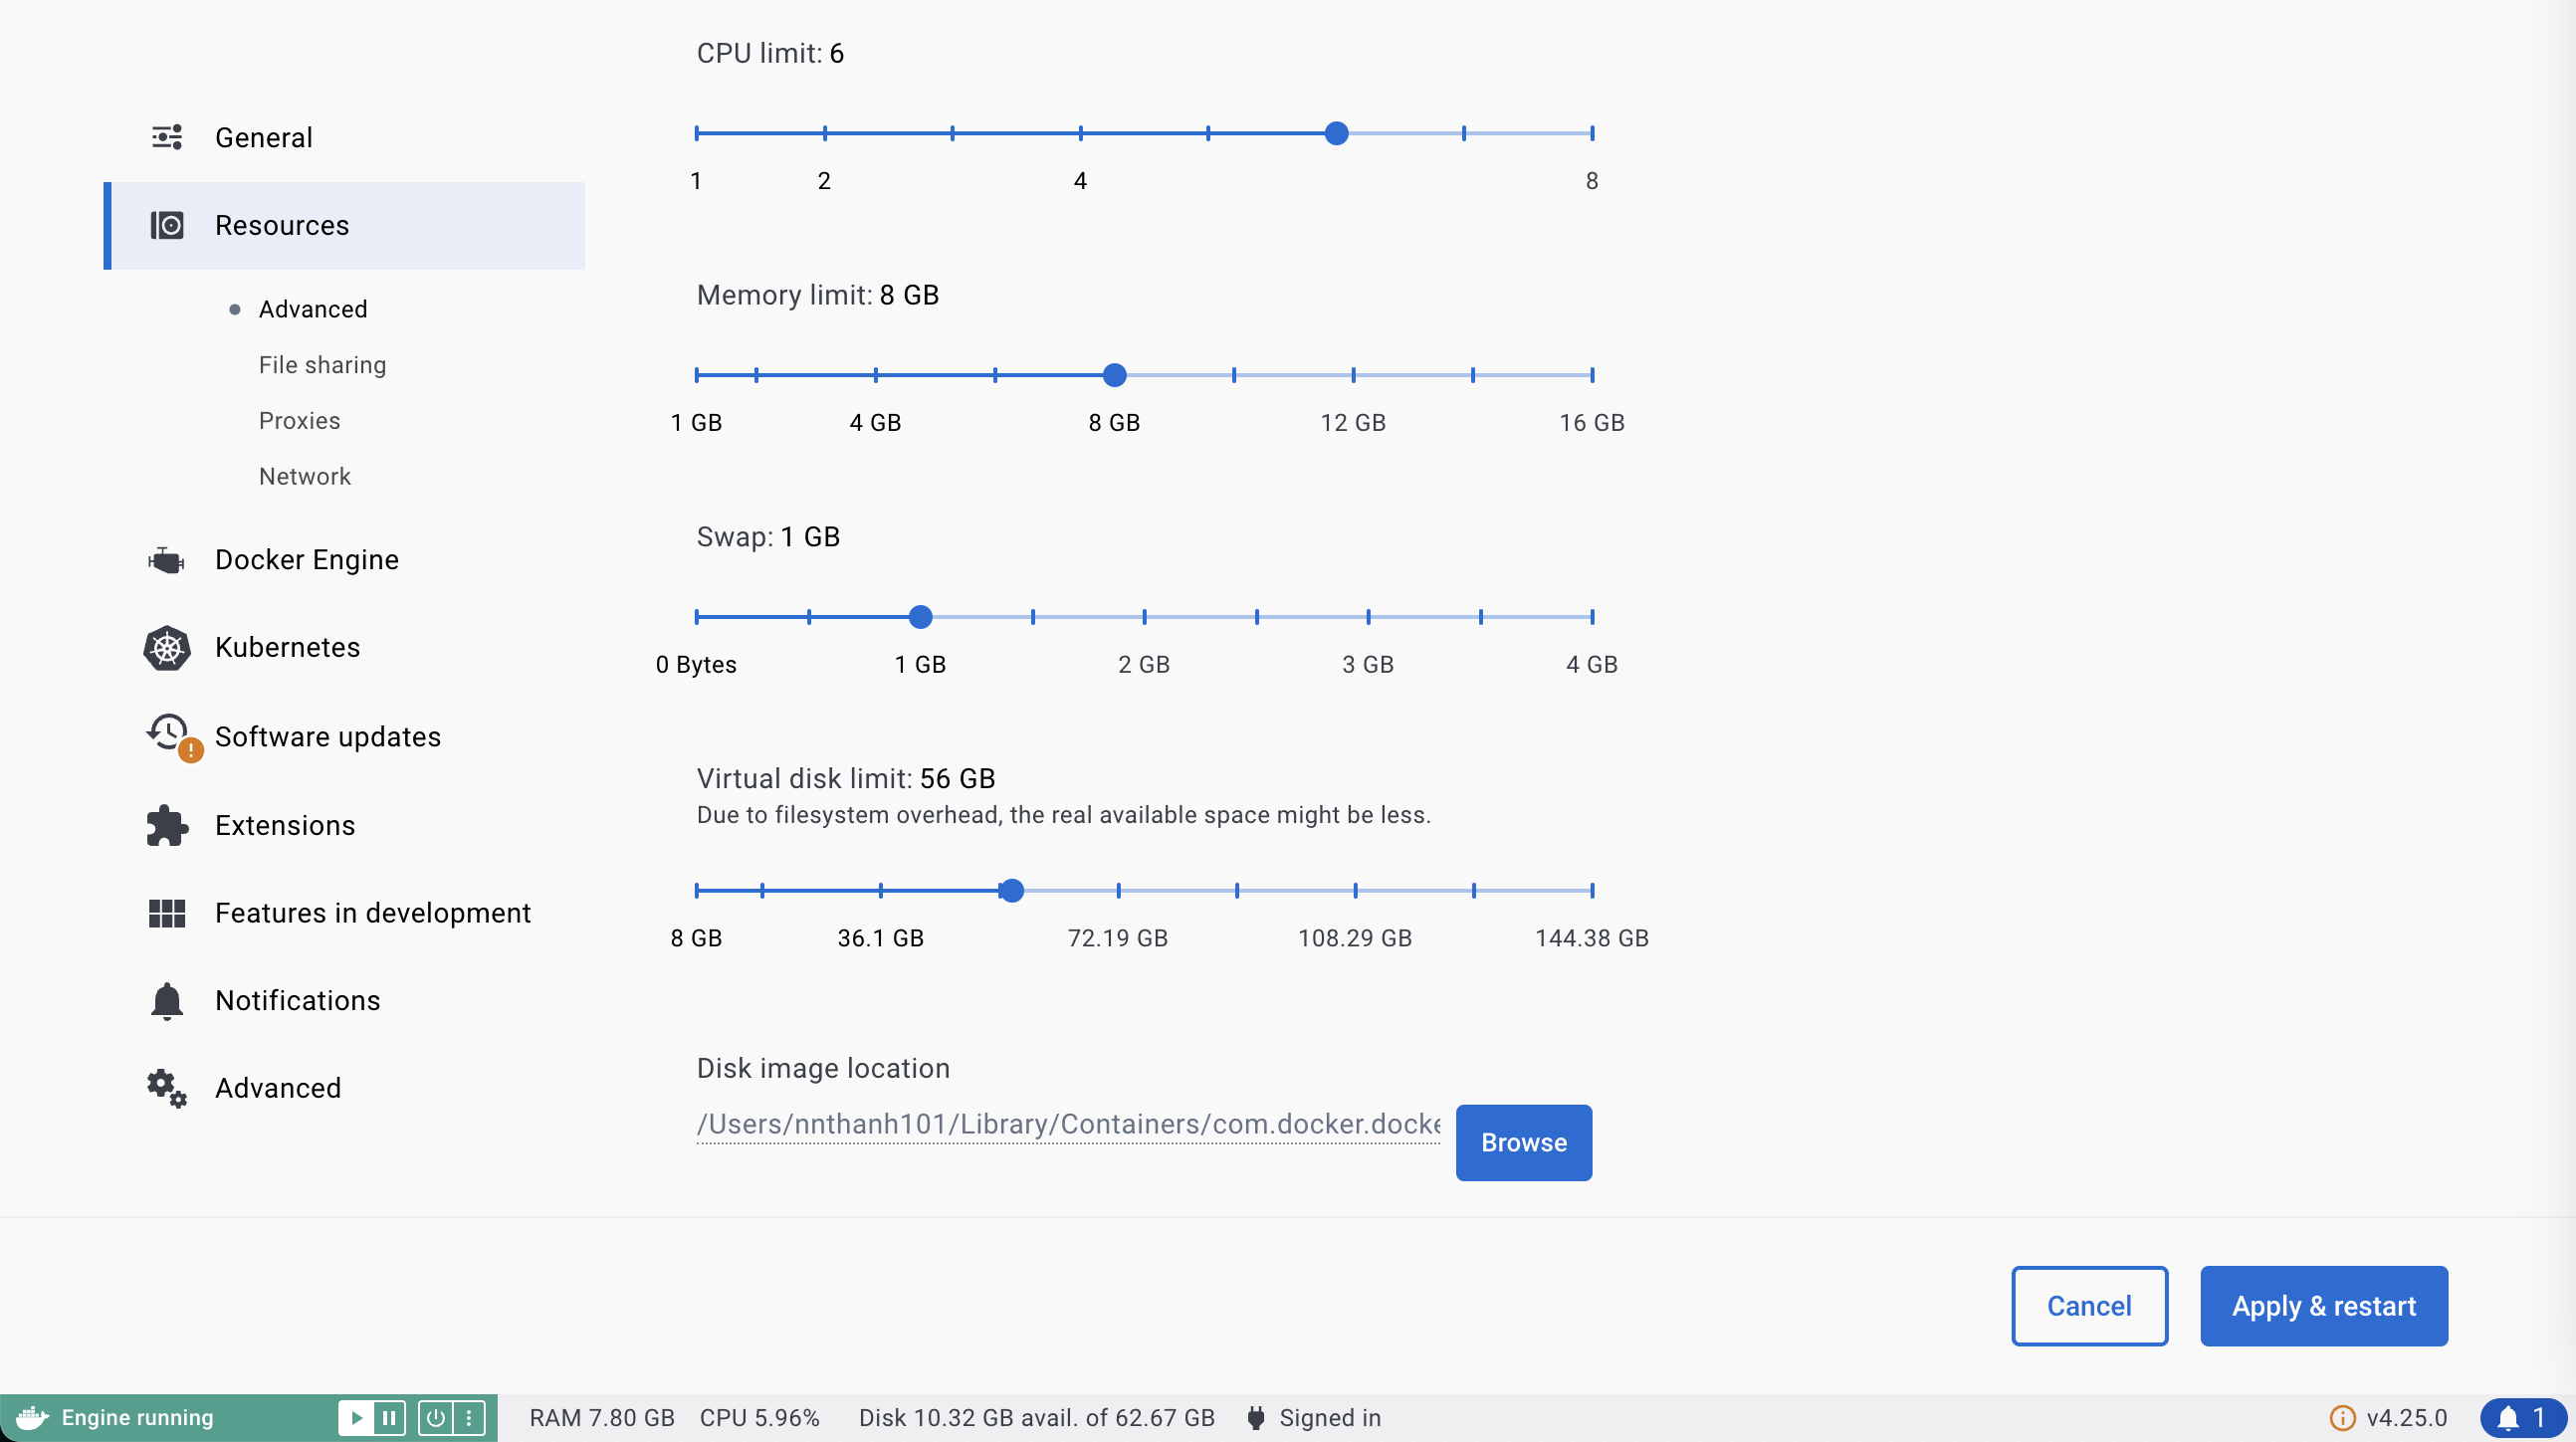
Docker is a tool used to run containerized applications. In the event that you require it for a project, Docker can be installed by following the instructions at
The system resources reserved for Docker should be modified during installation (2 CPUs and 2 GB RAM). If you are only running a few containers at a time then the default settings will be adequate. This will also leave more resources for your actual MacBook to consume if you leave Docker running in the background.
docker system prune --all --force
2.2. Installing Visual Studio Code
Visual Studio Code Extensions
☑️ GitLens [eamodio.gitlens]
✅ Jupyter [wholroyd.jinja]
✅ Kubernetes [ms-kubernetes-tools.vscode-kubernetes-tools]
[ ] Pylance [ms-python.vscode-pylance]
✅ Python
[ ] Remote - Containers [ms-vscode-remote.remote-containers]
[ ] ESLint
[ ] Excel Viewer
HashiCorp Terraform [4ops.terraform]
- Installing SourceTree Git
git clone https://github.com/nnthanh101/Machine-Learning

cd Machine-Learning
code .
2.3. Installing Web Browsers:
* ✅ Chrome
* ✅ Brave
* ☑️ Firefox
Install Web Browser Extensions (chromium)
3. Install Utilities
Install Software
☑️ Figma
Software Developer's Tech Stack
Docker
Front-End:
✅ TypeScript, HTML/CSS/JavaScript
✅ React, React Native, Next.js
Back-End:
✅ NodeJS 18.x
✅ Python 3.10.12
Redis
[ ] SQL: SQLite, MySQL/MariaDB, Postgres
[ ] NoSQL: MongoDB, DynamoDB
Data Science:
Python (pyenv)
Scikit-Learn
Tensorflow
Install Python
⛔️ Do not mess with your system Python: Avoid using or installing packages to ‘system Python’, the Python program already installed on your system.
✅ Prefer to use pyenv in macOS to manage my Python versions and virtual environments.
Note: if python-build fails due to “zipimport.ZipImportError: can’t decompress data; zlib not available” go here first.
Bash note: if using Bash then change
~/.zshrcto~/.bash_profilehere.
Install pyenv
## Install the prerequisites from Homebrew: https://github.com/pyenv/pyenv#homebrew-in-macos
brew update
brew install xz pyenv pyenv-virtualenv

# pip3 install --user pipenv
# pip3 install --user --upgrade pipenv

## Set up your shell environment for Pyenv
## Initialise pyenv when loading a new session
echo 'eval "$(pyenv init -)"' >> ~/.zshrc
# if which pyenv-virtualenv-init > /dev/null; then eval "$(pyenv virtualenv-init -)"; fi
Create Python 3 Venv
## Create a workspace for your development work
mkdir ~/workplace/<WORKSPACE_NAME>
## Change into the workspace directory
cd ~/workplace/<WORKSPACE_NAME>

## List the Python versions you have installed with pyenv
pyenv -v

## If you don't have the version installed that you want to use then list all versions available to install
pyenv install --list

## Install the version you want to use (Lambda runtimes) - this takes some time
pyenv install 3.12.1
# ls ~/.pyenv/versions/

## Select globally for your user account
pyenv global 3.12.1
## Set the local Python version within the workspace (current directory or subdirectories)
# pyenv local <VERSION>

## Make sure you are using the correct Python version: python --version
python -V
Handling virtualenv using pyenv-virtualenv
## Installing pyenv-virtualenv for virtual environment management
# brew install pyenv-virtualenv

## Run this command to add a new line to your to .zshrc
echo 'eval "$(pyenv virtualenv-init -)"' >> ~/.zshrc

## Create new virtualenv (e.g. pyenv virtualenv <python-version> <env-name>)
pyenv virtualenv 3.12.1 analytics

## Activate the virtualenv
pyenv activate analytics

## List all available virtual environments
pyenv virtualenvs
## Create the Python virtual environment and store it in the "env" directory
python - m venv venv
## Activate the virtual environment - you must do this every time you start a new shell.
## You can tell you are in the virtual environment if you see
## (env) at the beginning of your Terminal line
source env/bin/activate
## You are now ready to create Python code within a virtual environment.
## Running pip install will install packages to your "env" directory and
## will not make changes to your system packages.

## After you are finished working in the virtual environment you can deactivate it.
deactivate
JupyterLab
## Activate virtual environment if not already activated
pyenv activate analytics

## Install JupyterLab into your virtual environment
pip install jupyterlab

## Open jupyter lab
jupyter lab
## Reload your environment
echo "alias python=/usr/bin/python3" >> ~/.zshrc
echo "alias pip=/usr/bin/pip3" >> ~/.zshrc

source ~/.zshrc
## If using bash
# source ~/.bash_profile
Install NodeJS
curl -o- https://raw.githubusercontent.com/nvm-sh/nvm/v0.39.7/install.sh | bash

echo 'export NVM_DIR="$HOME/.nvm"' >> ~/.zshrc
echo '[ -s "$NVM_DIR/nvm.sh" ] && \. "$NVM_DIR/nvm.sh"' >> ~/.zshrc

# nvm ls-remote --lts
nvm install --lts=Iron
nvm use --lts=Iron
# nvm alias default 20.10.0

node -v
npm -v
npm install -g yarn aws-cdk

yarn -v
cdk --version
[ ] Setup Java
Bash note: if using Bash then change
~/.zshrcto~/.bash_profilehere.
## Add JAVA_HOME to your environment permanently - version 11 is currently recommended
echo "export JAVA_HOME=/Library/Java/JavaVirtualMachines/amazon-corretto-11.jdk/Content
## Verify that this is in ~/.zshrc or ~/.bash_profile
cat ~/.zshrc
## OR
# cat ~/.bash_profile
[ ] Install Ruby Languages
## Install the prerequisites from Homebrew
brew install rbenv libyaml libffi

## Set up the recommended Ruby version for Brazil
ruby-build 2.5. 8  ~/.runtimes/Ruby 25 x
Install AWS CLI
Note: if AWS CLI is version 1 then go here to install AWS CLI version 2.
  ## Check if AWS CLI version 2 is already installed
  aws --version
  ## If you see "aws-cli/2.0.0" or higher then continue
  ## If you see "zsh: command not found: aws" then download the package from below --> Download [AWS CLI version 2](https://awscli.amazonaws.com/AWSCLIV2.pkg)
Set Up AWS CLI Config File: AWS CLI v2 utilizes a config file to store frequently used configurations and credentials.
  ## Make sure ~/.aws exists
  ls ~/.aws
  ## If you see an error saying no such file or directory then create it
  mkdir ~/.aws
  ## Edit the config file
  nano ~/.aws/config
Add the following to your AWS CLI config file.
  [default]
  output=json
  region=ap-southeast-2

  ## (Optional) Add a named profile - boto 3 has issues assuming named profiles
  [profile oceansoft]
  output=json
  region=ap-southeast-2
To exit Nano, press Control+X, “Y” to accept changes, and then Return to save the file at
/Users/<ALIAS>/.aws/config. After, enter the following in the Terminal.## Check AWS CLI is working well aws s3 ls ## (Optional) Check that your named profile works aws s3 ls --profile oceansoft ## If successful, you should see a list of your S3 buckets and AWS CLI is successfully using temporary credentials
Install RStudio
✅ Install R: [R for macOS](https://cran.rstudio.com/)
✅ Install RStudio: [RStudio Desktop](https://posit.co/download/rstudio-desktop/)
Finished & Post Setup
If you followed along with this guide you should now have a working MacOS environment set up for development work. The Post Setup steps following this guide are needed every time you set up a new workspace for development work.
\> ✅ You may need to restart your computer after installing the above packages.
About the author
⬆️Skills to build & run Modern Applications ⚡ using Open-Source 🆓, Cloud-Native, Data Analytics 🔥
Comments
Join the discussionNo comments yet. Be the first to comment.
