![🆓 [Open-Source] Strapi Node.js Headless CMS 🌏](https://cdn.hashnode.com/res/hashnode/image/upload/v1665478901979/bxKkiPyF5.png?w=1600&h=840&fit=crop&crop=entropy&auto=compress,format&format=webp)


🎯 An Open-Source NodeJS-based Content Management System with a fully customizable API. You can save time and effort by creating production-ready Node.js APIs in hours rather than weeks. 🚀
🎯 Deliverables:
- Strapi CMS Backend Template: npmjs.com/package/strapi-blog
- Strapi CMS Backend: github.com/OceanSoftIO/cms-blog/tree/main/b..
DockerfileDockerfile.proddocker-compose.yml
🌥️ The cloud journey generally involves migrating and modernizing websites and apps, including building and hosting websites, developing web and mobile apps, and monitoring and managing them. This hands-on series illustrates how to build a production-ready Headless CMS and Headless eCommerce using Jamstack (stands for JavaScript, API, and Markup) on Cloud (Heroku, AWS ...).
- ✅ ⚡ Building a Production-Ready Headless CMS with Jamstack (Gatsby and Contentful) 🎁
- ✅ 🐳 Dockerizing Strapi - Open-Source NodeJS Headless CMS
- ☑️ 🐳 Medusa Headless-eCommerce - Open-Source Shopify alternative ⚡
1. Overview of Strapi Headless CMS
The Strapi Headless CMS is an Open-Source, Node.js platform for creating, managing, exposing and sharing content-rich experiences.
Traditional or monolithic Web-first CMS, such as WordPress, combine the frontend (website design and layout) and backend (the interface for editing and creating content) into a single application. The next-generation Content-first Headless CMS use an API for content delivery and allow complete separation of the backend (creation and storage) and frontend (design and deployment). Headless architecture not only rewards better performance and flexibility but also provides stronger security by making it nearly impossible for end-users to access the backend.
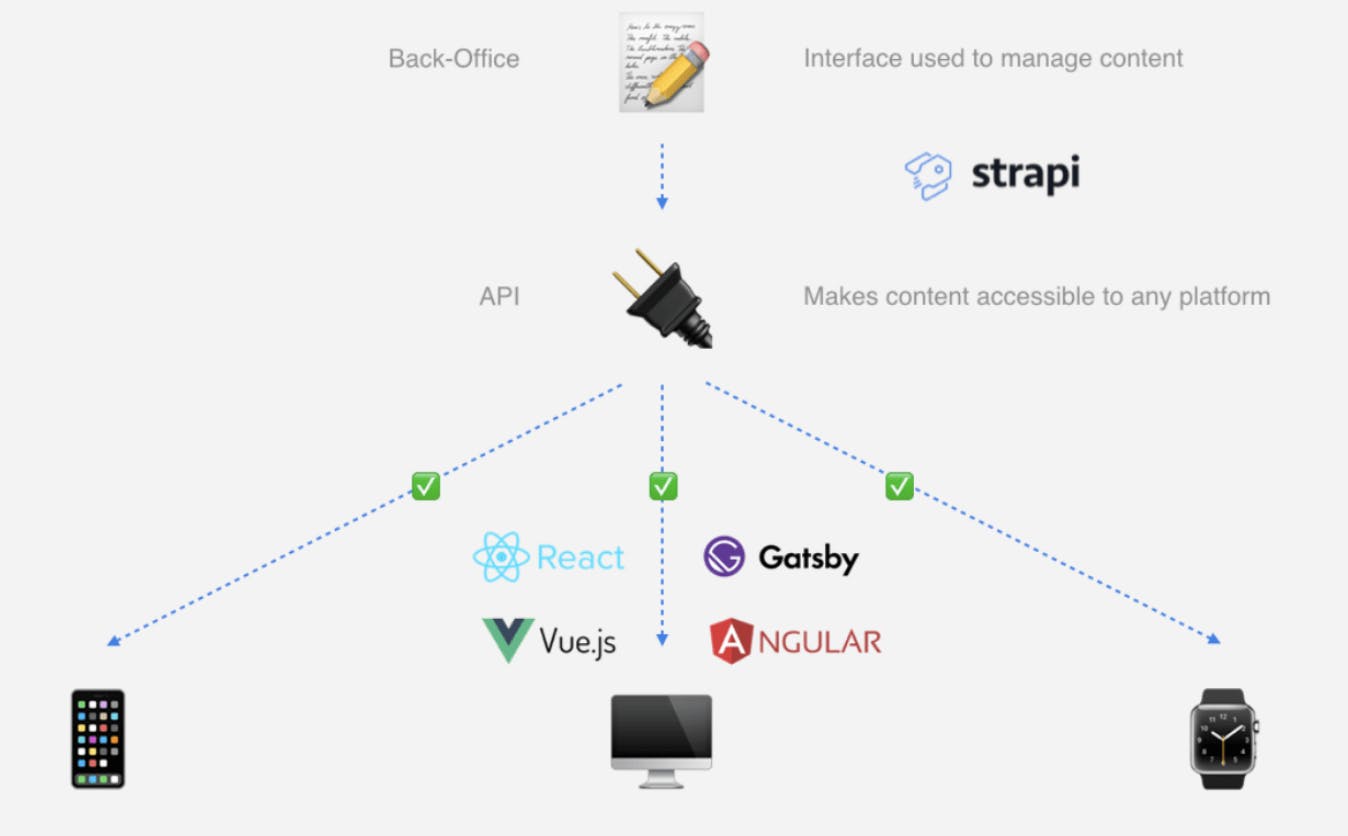
Developers are free to focus on designing amazing frontends that meet the needs of their customers because of all these benefits.
- Frontend: Developers can use their preferred frontend technology to deliver high-quality content experiences while quickly integrating features like authentication (via social media logins), content delivery, and payment processing into a full-fledged business application.
- REST & GraphQL API: The Strapi backend API makes content accessible and displayable on any device via a GraphQL or REST API. However, the exclusive focus is GraphQL API.
- Database Independent: A variety of database systems can be configured, including PostgreSQL, MySQL, MongoDB, and SQLite. However, we only configure Strapi for use with PostgreSQL.
2. Installing Strapi CMS-Backend
🚦 Prerequisites
- 👨💻 Setup Development and Testing Environment on MacOS
- ✅ Node.js v16
- ✅ Yarn v1
- ☑️ Gatsby CLI
Option 1. Git clone from github.com/OceanSoftIO/cms-blog.git
git clone https://github.com/OceanSoftIO/cms-blog.git
cd cms-blog
Option 2. Install Strapi CMS Backend with the blog schema template outside of the frontend directory on your machine.
echo "Strapi V4 template: https://github.com/OceanSoftIO/cms-blog/tree/main/template"
yarn create strapi-app backend --quickstart --template strapi-blog

echo "Strapi V3 OLD-version !!!"
# yarn create strapi-app cms --quickstart --template https://github.com/OceanSoftIO/cms-blog
Following the installation, Strapi’s control panel will open in your browser, where you can register the admin user and create content.
- Frontend (Gatsby or Next.js) integration
2.1. Powerful CMS-Backend GraphQL APIs
cd cms-blog/backend

yarn install
yarn develop
2.2. Testing and Deploying the Strapi API
3. Docker Setup
Developers are faced with the task of launching a development environment that has different software packages of certain versions. Fortunately, Docker solves this problem in the modern development world.
Creating
Dockerfile&docker-compose.yml
  # cd cms-blog/backend
  # cat Dockerfile
  # cat docker-compose.yml
-
🐳 Creating a new
Dockerfile: If you are using YARN, please use the following 👇FROM node:16 ## Installing libvips-dev for sharp Compatability RUN apt-get update && apt-get install libvips-dev -y # FROM node:16-alpine ## Installing libvips-dev for sharp Compatability # RUN apk update && apk add build-base gcc autoconf automake zlib-dev libpng-dev nasm bash vips-dev ARG NODE_ENV=development ENV NODE_ENV=${NODE_ENV} WORKDIR /opt/ COPY ./package.json ./yarn.lock ./ ENV PATH /opt/node_modules/.bin:$PATH RUN yarn config set network-timeout 600000 -g && yarn install WORKDIR /opt/app COPY ./ . RUN yarn build EXPOSE 1337 CMD ["yarn", "develop"] -
🐳 Optimizing your
Dockerfile☠️, then please use the following 👇The following are the methods by which we can achieve docker image optimization.

- Using distroless/minimal base images
- Multistage builds
- Minimizing the number of layers
- Understanding caching
- Using Dockerignore
- Keeping application data elsewhere
FROM node:16-alpine as build
## Installing libvips-dev for sharp Compatability
RUN apk update && apk add build-base gcc autoconf automake zlib-dev libpng-dev vips-dev && rm -rf /var/cache/apk/* > /dev/null 2>&1
ARG NODE_ENV=production
ENV NODE_ENV=${NODE_ENV}
WORKDIR /opt/
COPY ./package.json ./yarn.lock ./
ENV PATH /opt/node_modules/.bin:$PATH
RUN yarn config set network-timeout 600000 -g && yarn install
WORKDIR /opt/app
COPY ./ .
RUN yarn build

FROM node:16-alpine
RUN apk add vips-dev
RUN rm -rf /var/cache/apk/*
ARG NODE_ENV=production
ENV NODE_ENV=${NODE_ENV}
WORKDIR /opt/app
COPY --from=build /opt/node_modules ./node_modules
ENV PATH /opt/node_modules/.bin:$PATH
COPY --from=build /opt/app ./
EXPOSE 1337
CMD ["yarn", "start"]
Quick tour of
Dockerfile: 👇🐳 To get started, let's take a quick tour of Dockerfile: 👇
- Initially, we'll use
node:16(~330 MB) ornode:16-alpine(~39 MB) as our base image. - We'll install some libraries, like
libvips-devfor sharp compatibility, with-y, so say yes to everything. - The node environment AVG will be set to
developmentby default so we don't have to provide this each time. - The ENV allows us to override it if we want to switch from
developmenttoproduction. - We'll define our file paths and whatnot in the
/optWORKDIR working folder inside our container. - We copy package.json and yarn.lock (or package-lock.json if you're using npm) into our work directory. Docker caches each layer, so doing this first will speed up our build process.
- Docker then knows where to find our node_modules
- In case of network problems or a bit of slow internet, we will set a large timeout 600000 to allow extra time.
- Afterwards,
yarn installinstalls all dependencies. - Then we change the directories to /opt/apps
- Next, we copy the project we created in step 1,
cms-backend, into this folder. - We then run
yarn buildto build our MEAN project. - Finally, we expose port
1337and tell Docker to runyarn develop
- Initially, we'll use
.dockerignore👇🐳 Docker Ignore: Create a file called
.dockerignore: 👇.tmp/ .cache/ public .git/ build/ node_modules/ data/✍️ These folders in
.dockerignorewill be skipped ⛔️ by Docker 🐳 since they are not necessary.
4. Building & Running the Docker Image
- Building the Docker Image
docker build -t cms-backend:latest .- The name of the docker image is
cms-backend, and it's tagged with:latest - Lastly, grab a cup of coffee ☕️, normally a few minutes , and sit back while Docker does its magic 🪄
docker system prune --all --force- Running the Docker Image
docker run -d -p 1337:1337 cms-backend- Docker will run the image cms-backend, or whatever you called your project, 🤔 on port 1337.
-dmeans detached and is a fancy way of saying "Runs in the background"Tip: To use strapi on another port while developing, change the first part of the run port.
docker run -d -p 8888:1337 cms-backend
- Finally, run on port 1337 👍
✍️ We are currently using an SQLite database, which is always inside the container. Whenever we stop a container, we lose all changes. Using
docker-compose, we can use a Postgres database and run multiple instances of Docker if needed.
5. Utilizing docker-compose for the next level
🪄 Think of
docker-composeas a way to make different steps or services that we want to run.config/database.js⚙️
config/database.js👇const path = require('path'); // module.exports = ({ env }) => ({ // connection: { // client: 'sqlite', // connection: { // filename: path.join(__dirname, '..', env('DATABASE_FILENAME', '.tmp/data.db')), // }, // useNullAsDefault: true, // }, // }); /** PostgreSQL Database */ module.exports = ({ env }) => ({ connection: { client: env("DATABASE_CLIENT", "postgres"), connection: { host: env("DATABASE_HOST", "127.0.0.1"), port: env.int("DATABASE_PORT", 5432), database: env("DATABASE_NAME", "cms"), user: env("DATABASE_USERNAME", "cms"), password: env("DATABASE_PASSWORD", "cms"), }, debug: false, }, });.env⚙️
.env👇env HOST=0.0.0.0 PORT=1337 ... DATABASE_HOST=localhost DATABASE_PORT=5432 # DATABASE_PORT=3306 DATABASE_NAME=cms DATABASE_USERNAME=cms DATABASE_PASSWORD=cms NODE_ENV=development DATABASE_CLIENT=postgres # DATABASE_CLIENT=mysql🐳 In the root of the project, create a file called
docker-compose.yml. Due to the YAML format, spacing matters, so I've used spaces rather than tabs 👇version: "3" services: cms: container_name: cms build: . image: cms:latest restart: unless-stopped env_file: .env environment: DATABASE_CLIENT: ${DATABASE_CLIENT} DATABASE_HOST: cmsDB DATABASE_NAME: ${DATABASE_NAME} DATABASE_USERNAME: ${DATABASE_USERNAME} DATABASE_PORT: ${DATABASE_PORT} JWT_SECRET: ${JWT_SECRET} ADMIN_JWT_SECRET: ${ADMIN_JWT_SECRET} DATABASE_PASSWORD: ${DATABASE_PASSWORD} NODE_ENV: ${NODE_ENV} volumes: - ./config:/opt/app/config - ./src:/opt/app/src - ./package.json:/opt/package.json - ./yarn.lock:/opt/yarn.lock ##Replace with package-lock.json if using npm - ./.env:/opt/app/.env ports: - "1337:1337" networks: - cms depends_on: - cmsDB cmsDB: image: postgres:12.0-alpine container_name: cmsDB platform: linux/amd64 ##for platform error on Apple M1 chips restart: unless-stopped env_file: .env environment: POSTGRES_USER: ${DATABASE_USERNAME} POSTGRES_PASSWORD: ${DATABASE_PASSWORD} POSTGRES_DB: ${DATABASE_NAME} volumes: - cms-data:/var/lib/postgresql/data/ ##using a volume #- ./data:/var/lib/postgresql/data/ ##if you want to use a bind folder ports: - "5432:5432" networks: - cms volumes: cms-data: networks: cms: name: cms driver: bridge📚 I'll explain what all of this means: 👇
version- Docker-compose version 3services- We are defining two services cms and cmsDBcms- The name of the service we definedcontainer_name- The name of the container. You can call it whatever you want.build- Telling cms to build the image in our project folder..image- The image name we want to buildrestart- Unless we STOP or take down the container, it will keep restarting.env_file- Providing a .env file containing the environmental variables we should keep secret.environment- Here we define all the variables we want to use. Our.envfile will have$[THISISOURNAME]as a placeholder.volumes- mounting files into the container. Now this could be ./:/opt/app, but we might want to develop locally and just run our development server locally we are binding folders and some files to not bind node_modules There is some info about that here.ports- What ports we want to expose. Note: You can change the left side to another port, such as 8080:1337, but remember that the right side needs to be 1337, which is the port inside the container where CMS is running.networks- Set up a docker network so that our containers can communicate together. The Docker-Network tells Docker that before running the cms container, we need to run the postgresDB container first. This saves us some errors when we start the CMS container without a database.Similarly, we give Postgres a name, but we use the official
postgres:12.0-alpineimage instead of building it ourselves. In addition, we are creating a volume calledcms-datato hold our database.✍️ When installing Docker Desktop for MacOS, docker-compose is also automatically installed; however, for Linux, you must separately install it.
🚀 Running our project
[ ] 🐳 Local: This will now spin up just a Postgres database, and we can run and change files just like working on Strapi anywhere.
docker-compose up -d cmsDB && yarn develop[x] 🐳 Full: This will run Strapi inside a Docker Container and the database in its own container.
docker-compose up -d
Next Steps
- 1️⃣ Backend Deployment using Render, Heroku, GCP,
AWS - 2️⃣ Frontend: Gatsby Cloud, Netlify,
AWS Amplify - 3️⃣ Infrastructure as Code: Build and Deploy Application to
AWS App Runner || ECS/EKSusingTerraformandAWS CodePipeline