[💪 FullStack Serverless ⚡ Frontend 💎] Deploying Single-Page Application (SPA) with AWS CDK V2 🆓
![[💪 FullStack Serverless ⚡ Frontend 💎] Deploying Single-Page Application (SPA) with AWS CDK V2 🆓](/_next/image?url=https%3A%2F%2Fcdn.hashnode.com%2Fres%2Fhashnode%2Fimage%2Fupload%2Fv1666155034982%2Fd0wF3wdnP.png&w=3840&q=75)
⛅ Expertise in developing modern cloud-native applications ⚡ and data analytics 🔥
🎯 As the
frontendfor the Serverless Application on AWS, this React application has been bootstrapped with Create React App.💎 The AWS CDK Construct
cdk-spafor deploying Single-Page Application (Angular/React/Vue) to AWS S3 behind CloudFront CDN, Route53 DNS, Certificate Manager in minutes.💎 The CDK Construct
cdk-cognitofor deploying Amazon Cognito to provide authentication, authorization, and user management for web & mobile applications.
1. Create a Serverless Application using the AWS Cloud Development Kit (CDK) ⚙️
This is the CDK source code for deploying a Serverless Application ⚡ on AWS, which includes the infrastructure for the ReactJS Frontend, NodeJS Backend, Cognito authentication, authorization, and user management, CodeBuild / CodePipeline DevOps CI/CD, and IAM / KMS / CloudWatch Operation.
Step 1.1. Create an AWS CDK app
cdkCDK_APP_ID=cdk mkdir $CDK_APP_ID && cd $CDK_APP_ID cdk init app --language typescriptStep 1.2. Installing cdk-spa for deploying
frontendnpm install --save cdk-spacdk-spaOption 1. Basic setup needed for a non-SSL, non cached S3 website.cdk-spaOption 2. S3 deployment will be created, which is fronted by a Cloudfront Distribution.cdk-spaOption 3. The deployment of S3, Cloudfront Distribution, ACM SSL certificates, and Route53 hosted zones.
💎 This CDK TypeScript Construct Library
cdk-spaincludes a constructCdkSpaand an interfaceCdkSpaPropsto make deploying a Single Page Application (SPA) Website (React.js / Vue.js / Angular) to AWS S3 behind CloudFront CDN, Route53 DNS, Certificate Manager SSL as easy as 5 lines of code.Step 1.3. Usage of CDK constructs
Serverless/cdk/lib/frontend-stack.tsimport { StackProps, Stack } from 'aws-cdk-lib'; import { Construct } from 'constructs'; import { CdkSpa } from 'cdk-spa'; interface Props extends StackProps { contentBucket: string; } export class FrontendStack extends Stack { constructor(scope: Construct, id: string, props: Props) { super(scope, id, props); /** * 1. Encrypted S3 Bucket * 2. Deploying a SPA-Website to AWS S3 behind CloudFront CDN * 3. Auto Deploy to/from Hosted Zone Name */ new CdkSpa(this, 'CDK-SPA Website behind Cloudfront CDN', { bucketName: props.contentBucket, encryptBucket: true, // ipFilter: true, // ipList: ['1.1.1.1'] }) /* Option 1. Basic setup needed for a non-SSL, non vanity url, non cached S3 website. */ .createSiteS3({ // /* Option 2. S3 deployment will be created, which is fronted by a Cloudfront Distribution. */ // .createSiteWithCloudfront({ // /* Option 3. The deployment of S3, Cloudfront Distribution, ACM SSL certificates, and Route53 hosted zones. */ // .createSiteFromHostedZone({ // zoneName: 'serverless.aws.oceansoft.io', indexDoc: 'index.html', websiteFolder: '../frontend' }); } }Step 1.4. Usage of CDK Application
Serverless/cdk/bin/cdk.ts#!/usr/bin/env node import 'source-map-support/register'; import * as cdk from 'aws-cdk-lib'; import { FrontendStack } from "../lib/frontend-stack"; const APP_ID = "Serverless"; const account = process.env.AWS_ACCOUNT; const region = process.env.AWS_REGION; const contentBucketName = `${APP_ID}-${account}-${region}-content`.toLowerCase(); const app = new cdk.App(); /** * 1. AuthStack * 2. BackendStack * 3. FrontendStack * 4. OpsStack * 5. DashboardStack */ /* 3. FrontendStack */ const frontend = new FrontendStack(app, APP_ID.concat("-Frontend"), { contentBucket: contentBucketName, // env: { account: account, region: region }, }); cdk.Tags.of(frontend).add("APP_ID", APP_ID);Step 1.5. CDK Deployment
deploy.shecho "Boostrap the AWS Account/Region you plan to deploy to ..." cdk bootstrap aws://${AWS_ACCOUNT}/${AWS_REGION} echo "Installing & building ..." npm install npm run build echo "deploy this stack to your AWS account/region" cdk deploy --all --require-approval never
⚠️ CDK v1 👇
✅ Source Code: https://github.com/OceanSoftIO/Serverless/cdk
2. Deploying a CDK Application using AWS CloudShell 🆓
🆓 CloudShell provides you with a browser-based shell to run scripts and commands. It includes 1 GB of persistent storage per Region at no extra cost to you.
git clone https://github.com/OceanSoftIO/Serverless

cd Serverless/cdk
./deploy.sh
3. Create React Application frontend
✅ Frontend Tech Stack: ✅ React.js || ☑️ Next.js || ☑️ Angular || ☑️ Vue
To boot up Create React App, use the following command-line:
npx create-react-app frontend

cd frontend
npm start
☑️ Running Tests with the React Testing Library
npm run test☑️ Changing the App’s MetaData || Images || Other Types of Assets
☑️ Installing Dependencies
npm install axios☑️ Importing components
- ☑️ Styling React App with CSS
☑️ Building and Publishing the React App
npm run build
4. Deploying Amazon Cognito cdk-cognito
💎 The CDK Construct cdk-cognito for deploying Amazon Cognito to provide authentication, authorization, and user management for web & mobile applications.
5. When & Why & Should Developers consider Micro-frontends
6. Server-Side Rendering Micro-Frontend
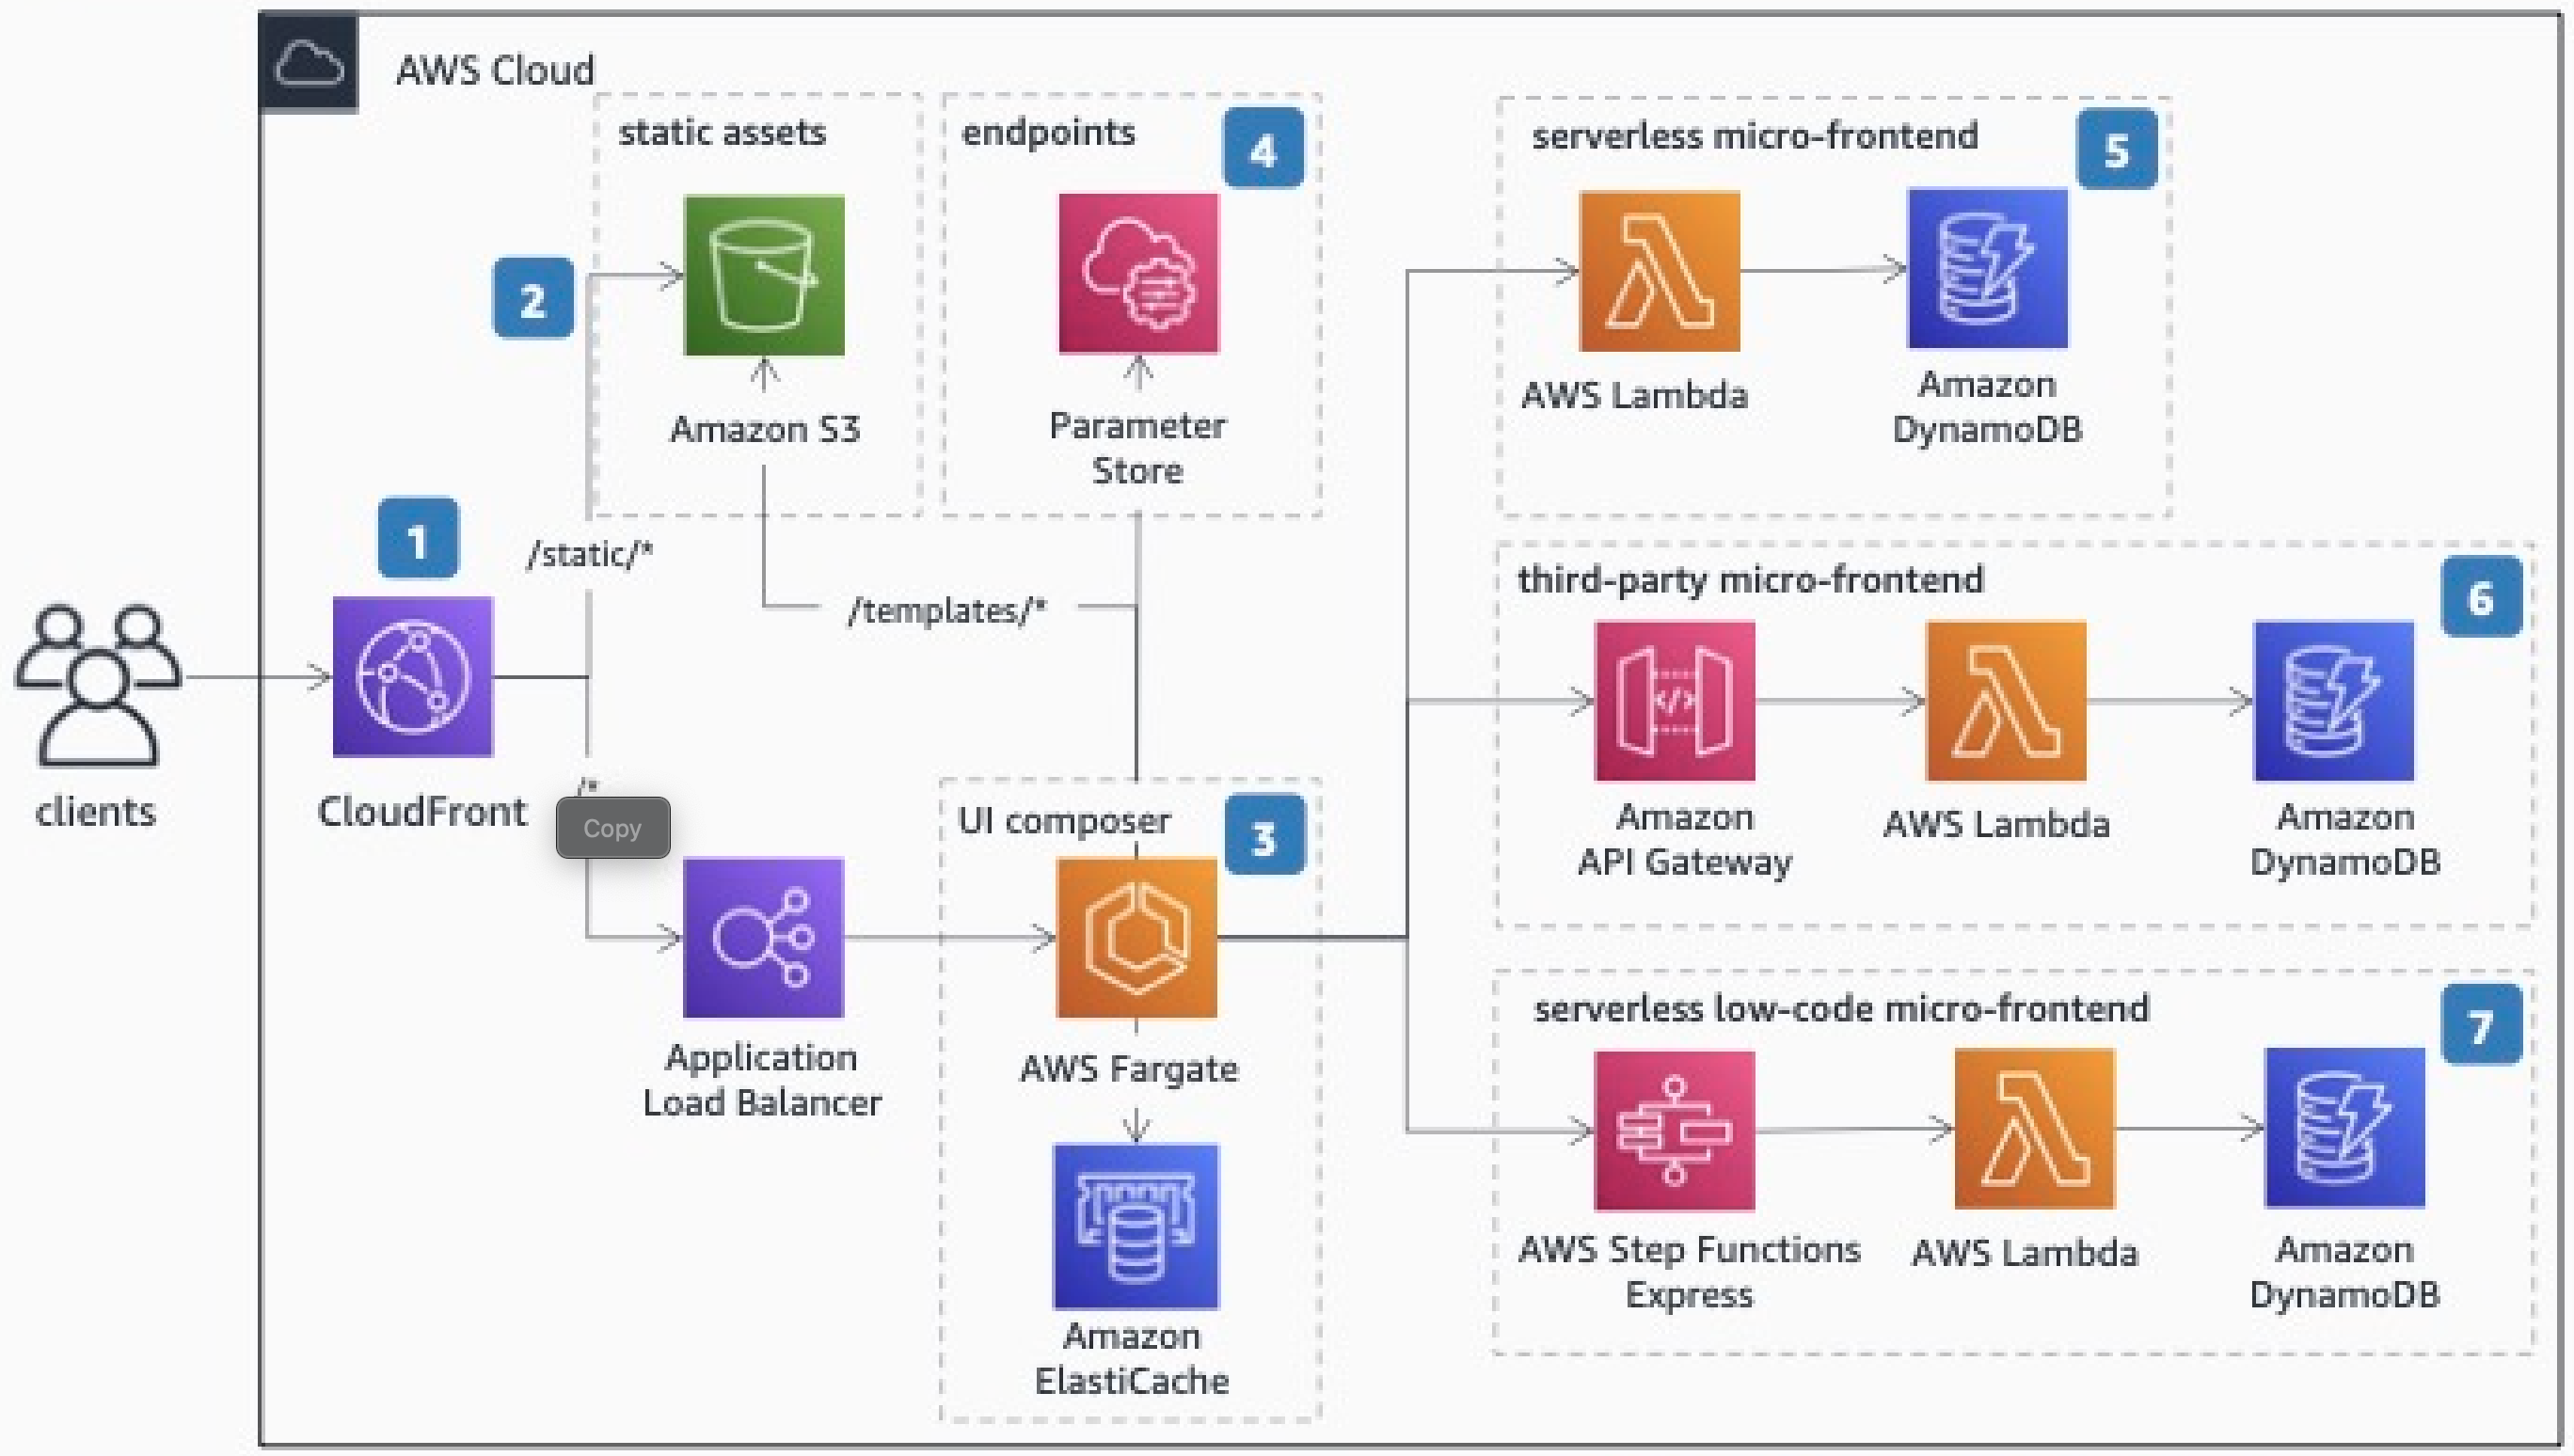
Micro-frontends are a very effective way to embrace distributed systems on the front end using a Serverless approach. As every Serverless Micro-Frontend returns an HTML fragment (HTML-on-the-wire), a UI composer stitches together these independent components, creating a seamless user experience.
This architecture starts with Amazon CloudFront that has two origins: an Amazon Simple Storage Service (Amazon S3) bucket, and a public Application Load Balancer.
The Amazon S3 bucket contains all the static files to be served for the browser, such as common micro-frontend dependencies, images, or CSS files. Additionally, it contains the templates required by the UI composer for placing each micro-frontend on an HTML page.
The UI composer is an AWS Fargate cluster that combines different micro-frontends into one and serves the results to the browser in real-time, streamlining the response to improve the performance of web applications. Using an Amazon ElastiCache cluster can increase performance even further by caching some micro-frontend output or the entire page.
Use AWS Systems Manager Parameter Store to collect all the micro-services endpoints. They can be HTTP endpoints, or Amazon Resource Names (ARNs) of a specific service such as AWS Lambda or AWS Step Functions. By decoupling, you maintain independence between the teams working on the application.
The serverless micro-frontend is composed of AWS Lambda and Amazon DynamoDB for storing the data that will be rendered. The output is an HTML fragment ready to be embedded in the template composed by the UI composer.
Utilizing Amazon API Gateway, which validates tokens or API keys, ensures that only your application can access those endpoints if you work with third parties in the same application.
Step Functions Express provides a low-code solution for creating micro-frontends. Step Functions' integration with over 200 services allows you, for example, to retrieve data natively from Amazon DynamoDB and delegate only the rendering of that data to an AWS Lambda function.
